
 ferrari spares
250 GTO Build (1)
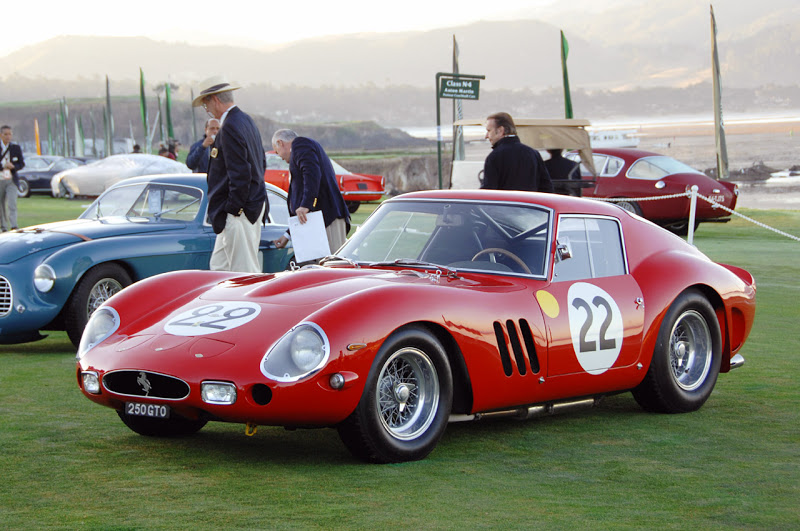
Nick Masons original 250 GTO with 3 vents on front wings,
(Would love to get a look at a real one so if you see this Nick please email me Thanks).
Hi I have decided to sell as is as I feel I can no longer continue to put the time and effort in to complete ??.
Now For Sale
£125K OBO
Swap RHD Ferrari 458/488 or lamborghini ? WHY
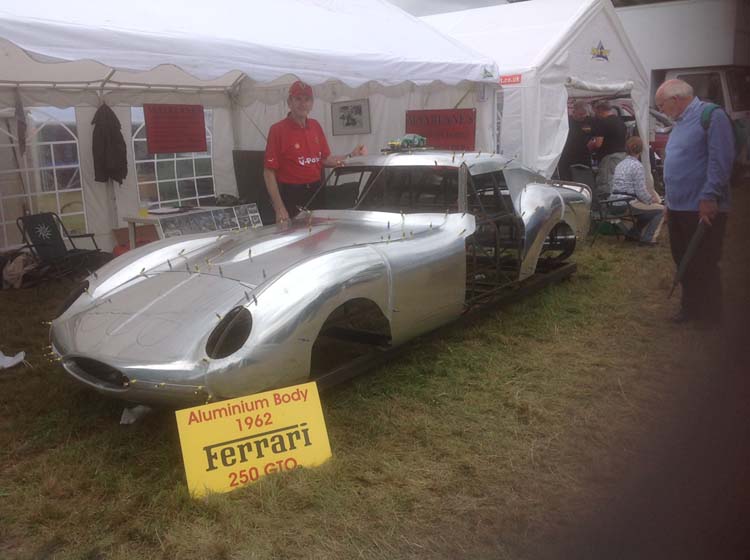
Above is me with that latest progress of the body which we took to Beaulieu where it generated quite a lot of interest.
Can anyone help with some of the finer details on the body like does the bonnet and boot opening have a Water drain gutter, as looking at some of the pics online it is not clear ???. Now we know no water gutters on Bonnet or boot.
Also the front wing side 2 or 3 vents are they wired or just a small 10 or 12 mm flange at 90 Degrees ??. These are wired with 2mm wire.
Any info on the tubelar framework supporting the bodywork to the Chassis ??.
Any help with locating and parts greatly appreciated.
While browsing the net I came accross a Company run by Stuart Brown www.3dengineers.co.uk who can Scan full size bodys etc, wish I had found him before we started on our Jig, but I have emailed him to see if he can help with any of the fineer details of the Bodyshell, and I am sure it will help someone else to know where to get things scanned.

My Wanted List
Cheap Maserati 4.7 Quatroporte, it can be damaged, writeoff etc, as long as the main items I want are usable.
GTO Windscreen, Lights front and rear, Spot lights, Headlamp Covers and chrome trim, Rear and Door perspex screens, Door & Boot locks and handles, Fuel Filler cap, Steering Wheel, Dash & Instruments, Handbrake lever, Gear Lever, Seats, Indicator Switch, Bonnet Air Scoops, Chassis blue print ?? anything, Set of Boranni Wire wheels and hubs ??,or anything that you have that might help, Thanks.
Hi, Welcome to my Ferrari 250 GTO build, I and like most Ferrari fans have always loved the 250 GTO but with the prices as they are today very few of us can actually afford one, so next best thing is to build one one using some more modern running gear, so what I have decided is to use most of the mechanicals from the Maserati 4200, as the Maserati has a lovely Ferrari designed engine with approx 400 Bhp and a lovely transaxle which gives an almost ideal weight distrubition, and all are mounted on subframes so all suspension etc is all ready done for us, the only problem is the actual track as the Maserati is approx 150 mm (6 inches) wider than GTO so we will have to try and get around this ??? as last thing we want to do is widen the body ? but it might come to that, if anyone has the X,Yand Z Datums of the Wishbones pickup points on the subframes that would be very helpful, as trying to measure from a car is not so easy, and if I have to move my wishbone mounting points inwards to alter track I want to be abe to maintain the OE Geometery by working it out on my Susprog software.
To start with we have got some Body blueprints which we have had blown up to full size so that we can make a full size Body Jig to make the Aly body on, my friend Steve McFarlane will be doing this and I will be helping.
Once I have got a suitable Maserati I will remove engine, Transaxle and both subframes complete with all suspension, I will remove all the air intake system from the Engine and convert to Throttle Bodies and use a Megasquirt 3 V3X ECU to run it which will be a lot easier than trying to use the OE ECU, the MS3X will let me run sequential fuel and spark, so I can use the OE Injectors and COP's, and should also be able to run Duel Lamda and Knock sensors, Launch control, and flat shift, which will be great to control the power especially if we can keep the weight under 900 Kg ?.
When I have got my Subframes etc all refurbished then I will start to make my oval tube chassis to join them together trying at the same time to follow the original GTO's layout of the main center section, that is where a Chassis blueprint/drawing would come in very handy to make it look right, and also if I am unable to use the Maserati subframes to narrow the track then I will have to make the complete chassis ??.
We have just got all the Steel to make the body Jig and 4 casters to move it about, and I have ordered a front screen ( expensive) but we got to have the correct one for the Jig, I will take some pics once we have something to show ??.
Tha Windscreen has arrived, so we will start on the Body Jig next week.
Here is the frame on which the Body Jig will be mounted on, ( my friend Steve Mcfarlane pictured with tape ) it will have casters so it can be moved about, ( Img 1 )
We had to stop as we found a problem with out Full size drawing ?? the wheelbase was 36 mm too short so we are having Graham Owens ( who is a great help) redo the Drawings and also darken the lines so they are easier to see from a distance.
We got the new modified Blueprint drawings back from Graham so they are now correct at the 2400mm wheel base shows the new Blueprint, shows another shot of the front and main center line so you can see the basic shape, and this week we have got quite a bit done, mainly the front grill surround and the front undertray, pic 2 shows Steve Mcfarlane whose shop we are in ( and you can see in the background the quality of his work, pic 3 shows the front of the jig with the grill surround and lower undertray, pic 5 shows me trying to look as if I know what I am doing ??.
( Img 2 ) ( Img 3 ) ( Img 4 ) ( Img 5 ) ( Img 6 )
Body Jig
Here are the latest pics showing the progress, we have the Aly Screen pattern made from the New Screen and started to make the Metal one to attach to the Jig, also you can see the Bonnet Frame in place and the middle of wing to front hoops so starting to look like a car ??, Metal screen frame now attached, and Bonnet Central Bulge also done and some wing profile hoops also attached.
Been busy and just added some more pics and it is starting to look like a GTO ? we got most of the front wings and doors done and hardest of all the Headlamp surrounds, next is roof and rear end.
( Img 7 ) ( Img 8 ) ( Img 9 ) ( Img 10 ) ( Img 11 ) ( Img 12 )
Here are a couple of more pics as you can see the Jig is almost complete, it just looks like a real GTO, I am just amazed we got it all done so quickely, Steve is just such an amazing craftsman he has a great eye for detail and as I was helping half the time I just did not know what I was making or doing, but as it was welded on to the Jig you could see it taking shape before your eyes, I can not wait to start on the Aly panels, so watch this space ??.
( Img 13 ) ( Img 14 )
Body Jig
Great news the Jig is all finished, and I am so pleased with the result so again all Thanks to Steve mcfarlane and of course for letting me asist from start to finish it is not everyday you get a chance to be involved hands on in building your life times dream car the Ferrari 250 GTO, and ok this is just the start but what a start even the Jig looks like a work of art, and again many thanks also must go to Graham Owens for all his effort in enlarging our original Blueprints, so here is a pic of the finished Product let me know what you think, I cannot wait to start on the Alley panels, and as soon as we get some panels made I will put up some pics, and Thanks for all the encouragement from you so far, Regards Eddie Walsh
( Img 15 )
Aluminium is ordered and hopefully will be delivered to Steves soon and then we can get started on the Body !!! I just cannot wait to get started, I will get some pics up as soon as we have some lovely aly panels to show, it is just amazing to think that we can turn flat sheets of aly into such a beautyful shapely body !!.
Here is what we and mainly me have been waiting for !!!! at last we are making some panels, Steve has started on the front end and I am doing the rear wings with a lot of his help as I can realistically only get them to approx half done and then Steve will do the final stages, but I am realy enjoying helping to Build the Beautyfull Aly Body for my very own Ferrari 250 GTO !!! now how many people can say that, even Nick Mason cant as he just shelled out a fortune for his, so anyway great progress for the first week and hope you like the pics ??, cant wait for next week ??.
Image 16 shows Steve starting on the very first Panel which is part of the front wing, Image 17 shows me starting on the front portion of the l/h rear wing, image 18 ,19 and 20 show Steves front end progress.
( Img 16 ) ( Img 17 ) ( Img 18 ) ( Img 19 ) ( Img 20 )
We have not done any more panels as Steve is busy doing another Customers Bentley, but hopefully we will get back on mine next week ??, Eddie.
Sorry for the delay, but good news we will be back on the Body Shell next week so look forward so more interesting pics ??? Eddie.
Body
Me and Steve got back on the GTO yesterday and today and got quite a few more panels done, now we have all the roof and the 2 sided panels that are just above the rear wings, I have a pic,and also the right front lower corner which in the pic shows Steve wheeling, and we have just started on the front lower panel roud the grill opening this will be in 2 parts, and Steve has also got the rear lower section of the front wings almost done.
( Img 21 ) ( Img 22 )
Hi Sorry for the delay in getting the latest news and pics of our progress, I have been to Ireland for a few weeks holiday and Steve has been to Paris for a short break as well, so this week end we are taking the 250 GTO Jig and with all of the Panels we have made to Beaulieu as it is a great place to show off this type of thing as people come from all over the World to buy and sell cars and parts and we might get some interest in our project, and meet people who have already done a simlar project and can offer advice and mabe some parts etc, so if you are going to Beaulieu on the 2nd 3rd or 4th September then do come along for a chat or just to take some pics, we are in the Red Field stand no 671, here are a couple of latest pics.
( Img 23 ) ( Img 24 )
Chassis
Hi sorry for the delay in updating as I have been busy doing other things, the Body Shell has not had much more done to it since last updated, but I have been working on the Chassis and got quite a lot done , the bottom rails with all the Mounting points for the 308 wishbones have been completed front and rear, the front rails had to be cut and modified as the engine is quite wide at the bottom so needed the rails further appart and the suspension/wishbones needed the rails to be closer together to maintain the narrow track ?? so that was a major job, but it is done now and all spotwelded, and I have also got some top rails with mounting points for wishbones temporary in position and currently trying to work out the positions for the Steering rack and anti-roll bar at front, and also rear anti-roll bar, also on the front top wishbones once position is finalised I will tilt them so we can generate some anti-dive geometry which may help in the handling ??, also all my wishbone pickups are adjustable which is very good thing so will be easy to set car up and alter settings at will, I have also shortened the Torque tube by 700mm between engine and Transaxle
( img 1 Ch ) ( Img 2 Ch ) ( Img 3 Ch )
Steve says we can get back on the Body Shell now very soon so hopefully in the next week or so, cannot wait as it has been so long and was beginning to think we would never get back on to finish it so great news.
Gearbox/Transazle
In the meantime I have been working on the Gearbox converting it from (FI automatic) to a manual stick shift which is progressing very well, I have done a temporary mockup and I can sellect all the gears, so now I am waiting for the return of the Torque Tube from my local engineer who is chopping another 50mm from it and then completely welding the flange back on and skimming to true it up as I need that as that is where my gearlever mechanism will be mounted.
( Img 1 ) ( Img 2 )
Chassis - Engine
I will also have to make new Engine and gearbox mounting Brackets and choose some different Mountings ??.
I have removed the Exhust manifolds to see if they can be swapped around from left to right which they can so that will position the outlets further forward to give me more room in the footwell for pedals etc ??.
As I said me and Steve are back on the bodyshell and we have got quite a bit done in the last couple of weeks, the complete front end is all welded together, the three side vent on the front wings have been made and wired and they look great, the three vents on the top and bottom of the nose section have been made and fitted temporarly and the Dzus fastners fitted for the top ones, and also the Radiator access hatch is made and hinges fitted, Headlamp recessed bowls have been made and are fitted again temporarly so not welded in yet, but they look great, so front end is now virtually complete all that remains of the front is the Bonnet ???, which we are now going to change the shape of the power bulge, as after seeing Nick Masons car at the Warren Car Show a couple of weeks age we realised we had got that shape wrong, we had got the shape from the B.P. Drawing we got online but we have checked and not one car has ever had our teardrop shape bulge, so after thinking about it for several weeks we came to the conclusion that if we wanted to change it now was the time so we did, other items to be done are the Front Spotlamp buckets and the round cooling ducts for the front brakes,and the front side lamp recesses, we have also welded the four roof sections together, that was two sides and a front and also chased in the top Screen recess, and we are now working on the two rear side buttress panels and making the small Access hatch for the Oil Filler for the Dry Sump tank on the left side one that is now complete with hinges and Dzus fastner, also the butress Panels are welded to the rear wings and rear screen recess is joddled in, we also looked at the rear wing side vents and again compairing to Nick masons car we had got the shape not quite right so we changed that, but then thinking about it we decided that these vents should only be cut out after the wheel arches have been cut out and wired as the spacing between the vent and arch is critical and we do not want to get that wrong, so far we are very pleased with current progress.
( Img 25 ) ( Img 26 ) ( Img 27 )
Body
Now we are back on the rear ducktail which is a lot harder than we thought but now it is almost sorted and looks great should be all welded together next week, yes great progress this week all the rear end is welded together, that is ducktail to rear wings, panel above bootlid, rear lower panel and left and right rear lower corners behind the rear wheels and all looks great.so some more pics.
( Img 28 ) ( Img 29 )
Body
This week we have repostioned the fuel cap cut out as per Nick Masons car and also moved the outline for the boot apperture, does anyone have any pics of the fuel filler neck with the fuel cap open and it would be nice to have it mounted as original. we have the OE size Fuel cap casting.
Also we have made the the two front round air vents for cooling the brakes, and got most of the housings made for the spot lamps, and marked out the cutout positions on the nose section, it is great to see all these small details that make the GTO so distincitive.
Body
Got the spot lamp housings fully made and the openings cut out in the nose so all that remains is to weld the housings to the nose openings we will weld all three at same time , that is the Spot Lamps, Brake cooling Ducts, and small Side lamp housings, the small sidelamp housings are fully made and openings cut out on each front wing, so before we remove the front end from the Jig once again we will redo the Bonnet Power Bulge.
( Img 34 ) ( Img 35 )
Body
We have made the new front bonnet/hood with correct size power bulge, just needs to be welded together and looks great we are very pleased we decided to change it, so we have now done all we can with the Body Shell on the Jig so we have now taken the Body Shell on Jig back to my Workshop where I will have to get my finger out and get the Chassis finished to start mounting the Body Shell.
( Img 36 ) ( Img 37 ) ( Img 38 ) ( Img 39 ) ( Img 40 )
Chassis
It has been a while since I have updated progress, but I have been doing bits here and there when I have the time, all the top and bottom wishbones are now fitted to the chassis and shock and spring mounts, check out Links 46 & 46A below, so just the Steering rack and anti roll bars to sort out, I have got a Steering rack from a Classic Mini which according to my Suspension Software I will have to shorten the Rack bar and Housing to keep my Geometry correct, After fitting my new Engine mounting brackets my Exhaust Manifolds still will not clear so I will have to make some new Manifolds to clear ??, But the new Mountings look great and engine is sitting as low in the chassis as possible which is a lot better for the center of gravity so well worth doing.
( Img 41 ) ( Img 42 ) ( Img 43 ) ( Img 44 ) ( Img 45 ) ( Img 46 ) ( Img 46A )
Engine
I have also got all my Motorbike Throttle Bodies welded to my new Lazer Cut Manifold plates and with my Long Spun Velocty Stacks they look great so should push my BHP to near 450 ?? and of course they will definately sound great, just got to get my Megasquirt ECU ( I have built an MS3 V3 X) wired in which will also help with the BHP. Also I still need to get the Prop Shaft shortened to suit my shortened Torque tube, and also my Drive shafts ( If anyone knows of anyone who can do this by Friction welding I would appreciate it as I am told it is the best way to shorten shafts that are subjected to massive Reversing Torque loadsThanks) also all rear Suspension wishbones and shocks are fitted in correct positions as per my Suspro software so in all looking great, check out Links 51 & 52 below.
( Img 47 ) ( Img 48 ) ( Img 49 ) ( Img 50 ) ( Img 51 ) ( Img 52 )
Body
I have also had the Front Body section off of the Jig so I could Tig weld in the Left and Right side/Indicator lamp housings into the lower front nose, and also welded in the front Spotlight Buckets, and before I welded in these I cut out a large oval hole in the rear of the bucket so we can also get some extra air through behind these lamps ?? why not ?? as once the lamps are fitted the holes cannot be seen, also reading David Clarks book on the GTO he said one of the problems with these Buckets and the Brake cooling ducts is that the Bodywork cracked up around them as they suffered from quite a lot of vibration so I have worked out how to add some extra support to these by fitting some extra Brackets between them and the undertray ?? so hopefully that will sort that out. I have also temporarly fitted the 3 upper and lower Iconic air scoops and Rad access hatch, also the Oil Filler hatch on the rear left Buttress, looks great.
( Img 53 ) ( Img 54 ) ( Img 55 ) ( Img 56 ) ( Img 57 ) ( Img 58 ) ( Img 65 ) ( Img 66 )
( Img 67 ) ( Img 68 )
Gearbox/Transaxle
I have also made all three transaxle mounting brackets which have turned out quite well and look very capable of coping with all the power and torque from the engine, and also had to bear in mind that the Transaxle and Torque tube will have to be moved backwards to remove/change the clutch.
( Img 59 ) (Img 60 ) ( Img 61 ) (Img 62 ) (Img 63 ) (Img 64 )
Hi I have decided to sell as is as I feel I can no longer continue to put the time and effort in to complete ??.
Now For Sale
£125K OBO
Swap RHD Ferrari 458/488 or Lamborghini ? WHY

